
| How to Create High-Resolution Digital Banners Without Complex Software?
The article explains how to create high-resolution digital banners without complex software. It covers choosing the right banner sizes, using quality images, and selecting proper export settings. It also shares practical tips for creating sharp, professional-looking designs. |
Learning how to create high-resolution digital banners involves four major steps. You’ll pick the published pixel size, add sharp assets, export the right file, and check it at the final size.
Choosing the right dimensions can feel tricky. A design may look sharp on your phone but blurry elsewhere. This often happens when the image has too few pixels. Print banners also need different settings from website banners. So, your dimensions and export format are important.
This guide covers the process, from choosing dimensions to exporting the finished banner. You’ll learn what resolution means, which dimensions to choose, and how to prepare images.
What Makes a Digital Banner High Resolution?
A digital banner is high resolution when it carries enough pixels for the size it will be displayed at. On a screen, that means its pixel dimensions, not its DPI setting. DPI does not affect how sharp an image looks online. What matters is the number of pixels across its width and height.
For print, it means pixels per inch measured at the distance from which people will actually be viewing it.
Print banners work a little differently. Their sharpness depends on pixels per inch (PPI). PPI tells you how many pixels fit into each printed inch. The right number also depends on how far people stand from the banner.
HP recommends these general ranges for large-format printing:
| Viewing Distance | Recommended Resolution |
| 3-5 feet | 150–200 PPI |
| 5-10 feet | 100–150 PPI |
| 20 feet or more | 50–100 PPI |
Start by checking where people will see your design. Then choose dimensions that match its final size. This helps ensure your banner stays sharp at its intended size. The same rule applies for photo editing. Always check the image size before adding it to your design.
| How Do You Know If Your Banner Is High Resolution?
A high-resolution banner has enough pixels for its display size. For print, consider how far people will stand from the banner. |
What Size Should Your Digital Banner Be?
Your banner size depends on where you want to use it. Always check the required dimensions before you get to design anything. This way, you’ll save yourself from resizing later because it can stretch images, blur text, or change the layout.
Google, for example, lists specific dimensions for its display ads. YouTube also has its own requirements for channel art. The table below covers these sizes and common print formats.
| Where the Banner Goes | Pixel Dimensions | Source |
|---|---|---|
| Leaderboard ad placement | 728 × 90 | Google Ads Help |
| Inline rectangle ad placement | 300 × 250 | Google Ads Help |
| Wide skyscraper ad placement | 160 × 600 | Google Ads Help |
| YouTube channel art | 2560 × 1440 | YouTube Help |
| Printed banner read from 5 to 10 feet | Finished size in inches × 100 to 150 PPI | HP |
| Trade-show graphic read from 3 to 5 feet | FInished size in inches × 150 to 200 PPI | HP |
The most common horizontal Google Ads image size is 1200 × 628 pixels (1.91:1). Square images have dimensions of 1200 × 1200 pixels (1:1).
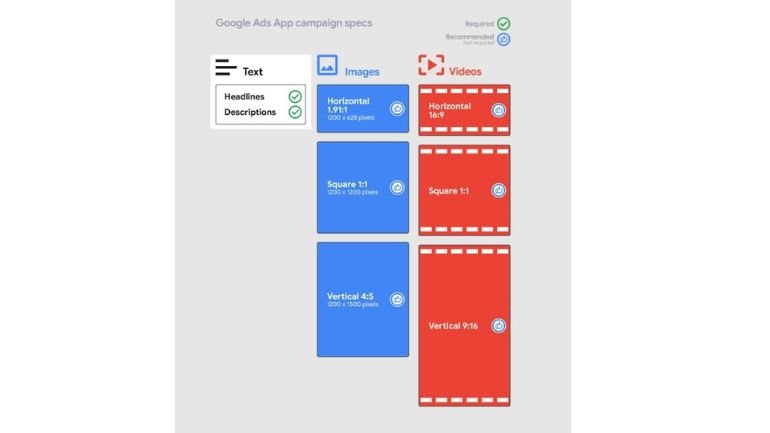
Google also requires display ad files to stay within 150 KB. It accepts GIF, JPG, and PNG formats. Check these requirements before exporting your design.
For print, calculate the pixel dimensions from the banner’s physical size. Multiply its width and height in inches by the required PPI. For example, a 48 × 24-inch banner needs 4,800 × 2,400 pixels at 100 PPI.
Set the canvas to your chosen dimensions before you start your banner design. Then add your text, images, and logos.
| Which Banner Dimensions Should You Use?
Use 728 × 90, 300 × 250, or 160 × 600 pixels for common Google display ads. For print, calculate the pixel dimensions from the finished size and required PPI. |
How to Create a High-Resolution Banner Without Design Software
Learning how to create high-resolution digital banners comes down to four steps. Start with the destination’s published pixel size, then choose artwork large enough. Export in the required format and check the banner at its actual display size.
You don’t need installed banner design software for this process. Browser-based digital banner design tools can handle the basic work.
1. Start From the Exact Size Your Destination Publishes
Before you create a digital banner, decide where it will appear. Is it going on a website, social media page, or printed display? Each destination has its own size requirements, so don’t guess the dimensions.
Online banners are a major part of digital marketing strategies for businesses. According to We Are Social’s 2025 Digital Report, global online banner ad spending was at $174 billion in 2025.
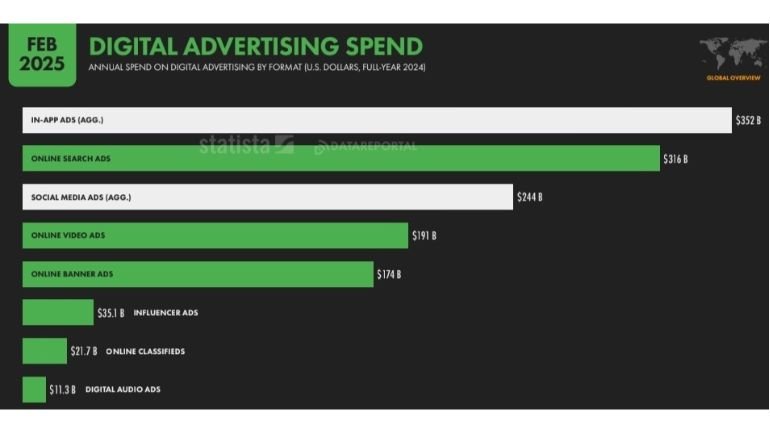
Once you’ve decided the platform the banner will appear on, check its published banner dimensions.
Here are common sizes for social media banner designs:
- Facebook Page Cover: 851 × 315 pixels
- LinkedIn Personal Profile Banner: 1584 × 396 pixels
- LinkedIn Company Page Cover: 1512 × 256 pixels
- X (Twitter) Profile Header: 1500 × 500 pixels
- YouTube Channel Banner: 2560 × 1440 pixels
- Pinterest Business Profile Cover: 800 × 450 pixels
Many browser-based editors offer preset sizes for common banner placements. You can choose the right option, and the editor sets up your canvas. Then you can add your text, images, and other design elements to create high-resolution digital banners.
2. Build With Images and Logos That Hold Up at Full Size
Image quality matters just as much as canvas size. Your source files should always match or exceed the dimensions they need to fill.
When you stretch a small image, the software must estimate the missing pixels. The result often has blurry edges, rough details, and unreadable small text.
Image enhancer or upscaler tools can enlarge files, but they cannot always restore lost details. Your best option is to start with the original, high-quality image. For logos, use vector formats such as SVG so you can retain their sharpness.
Check every asset before adding it to your design. Zoom in to inspect edges, text, and fine details. These checks will help you create high-resolution digital banners that stay sharp at full size.
3. Export the File Your Destination Actually Accepts
Before exporting the file, check the file format and size limits if they match your destination’s. Different platforms and print shops accept different file types. For example, Google Ads accepts GIF, JPG, and PNG image files. Its display ad specifications also set a 150 KB file-size limit.
If you choose the wrong export settings, the platform may reject the file if it exceeds the size limit. Heavy compression can also remove important details and make images look blurry.
Print banners need different export settings from online designs. Ask the print shop for its preferred file format, color mode, and resolution. Some shops also request PDF files with embedded fonts or outlined text. Always follow the printer’s specifications before sending your final design.
4. Check the Banner at Its Final Display Size
Before publishing, check how your design looks at full size. Inspect every detail before publishing your banner.
A banner might look sharp when zoomed out in your editor. But at 100% zoom, blurry edges and rough details become easier to spot.
Start with the text, logos, and smaller design elements. Can you read every line without zooming in further? Do the letters look sharp, and do the logo edges remain smooth? Fix any blurry areas before exporting the final file.
| What Does It Take to Create High-Resolution Digital Banners Without Design Software?
You need the right dimensions, quality images, and the correct export settings. Online design tools can handle the process without the need of complex software. Check the finished banner at full size to catch any flaws before publishing. |
FAQ
- Can you really create banners without design software?
You can create high-resolution digital banners without installing design software. A browser-based editor still counts as software, but you use it online. You do not need to download a program or learn complicated design tools. You still need to choose the right dimensions, use sharp images, and export the banner correctly.
- Is a YouTube banner 16:9?
Yes. YouTube recommends 2560 × 1440 pixels, which has a 16:9 aspect ratio. However, the banner may be cropped on different devices. Keep important text and logos within the central safe area to prevent them from being cut off.
- How many pixels do you need for a 2 × 6-foot printed banner?
A 2 × 6-foot banner measures 24 × 72 inches. At 100 PPI, use 2,400 × 7,200 pixels. At 150 PPI, use 3,600 × 10,800 pixels. Choose based on how close people will stand when viewing it.
- How do you fix a logo that is already too small?
Go back to the original file instead, and export it again at the size you actually need. If that file is gone, ask the designer who made the logo for a vector or full-size version, or rebuild it. Create high-resolution digital banners with logo files that retain their detail at full size.
- What size is a 1920×1080 image?
A 1920 × 1080 image describes its pixel dimensions, not its physical size. It has a 16:9 aspect ratio, like a YouTube channel banner. These dimensions can work well for many screen-based designs.
- Can you make a low-resolution image high-resolution?
You can enlarge a low-resolution image with an upscaling tool, but the result may still look blurry. It’s best to always start with a larger source image whenever possible.
- What is the best file format for a high-resolution banner?
PNG works well for banners with text, logos, and transparent backgrounds. JPG is suitable for photographs and smaller file sizes. For print, ask your printer which format they accept.
- How can you check if a banner is high-resolution?
View the banner at 100% zoom to inspect its details. Check whether the text looks sharp and the images remain clear. Look for blurry edges, pixelation, or distorted logos. For printed banners, request a sample before approving the full print.
Final Thoughts
You don’t need expensive design software or advanced skills to create high-resolution digital banners. The important thing is knowing what your design needs and making thoughtful choices. A good banner should look sharp, communicate its message, and fit its intended purpose.
Don’t wait until you have professional design software before trying your first banner. Start with a simple project and put these tips into practice. Pay attention to how your designs look across different screens and displays.
Be the first to comment on "How to Create High-Resolution Digital Banners Without Complex Software"